In my previous article, Creating a VPC - Part 1, I've shown you how to create a VPC using the VPC Wizard. Here I will demonstrate how to build a VPC manually, without using the Wizard.
We will use the same requirements:
1. End users are located in US Northern Virginia
2. VPC requires 1 Private and 1 Public subnet with the private subnet having
outbound access to the internet.
3. Defined CIDR Block is 10.0.0.0/16
Method 2: Creating a VPC manually
1. Login to the AWS management console using your Admin account.
2. Select your location based on where your end users will be. In this
case it is US Northern Virginia (US East 1)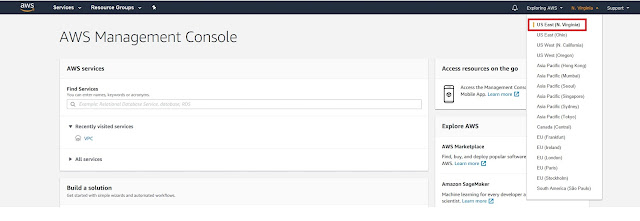
3. Click "Services", then scroll down to Network & Content Delivery
and then click "VPC".

4. From the Navigation pane click on "Your VPCs".
 5. Then click "Create VPC"

6. Enter the name you wish to give your VPC. Then enter the CIDR Block
for your VPC as well.
Here you can also setup IPv6 if needed or just leave it ad default if not.
As for Tenancy, you have a choice dedicated or default.
Click "Create"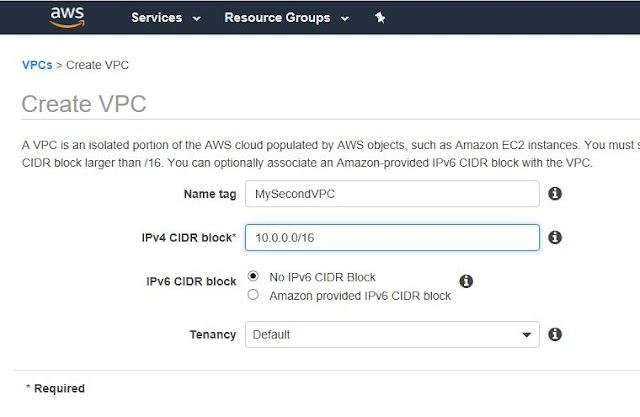
7. You will receive a confirmation that your VPC has been created.
Click "Close" on this window.
You should now see your VPC on the list.
8. Now we have to create the subnets to fulfill our requirements.
On the Navigation pane click on "Subnets"
 9. Click on "Create subnet".
10. Enter the name you want to give your subnet. I'm naming it MyPublicSN.
Choose your VPC from the list
Choose the Availability zone you wish to deploy it to.
Then provide the CIDR Block for this subnet. I'm using 10.0.0.0/24.
 Click on the "Create" button after verifying your settings.
Your Public subnet is now created. Click the "Close" button to close
the window.
11. Now we still have to create the Private subnet.
To do this you can follow the same steps from step number 10.
This time just name the subnet differently to denote it's the Private subnet.
I'm naming it MyPrivateSN
The CIDR Block I'm assigning it is: 10.0.1.0/24

12. Now that we have both Subnets, it is time for us to make the necessary
configurations to make one subnet a private subnet and the other
a public subnet.
To do this we need to first create an Internet Gateway (IGW).
This will be your door to the Internet.
So on the Navigation Pane click "Internet Gateways"
Then click "Create Internet gateway"
Provide it a name (I named it: MyIGW) then click "Create"

13. Click "Close" to go back to the Internet Gateway window.
Now we need to attach the IGW to our VPC.
Select the IGW you created, click "Actions" and then click "Attach to VPC"
Select your VPC from the list and then click the "Attach" button.

14. Now we need to create the necessary Route Tables for the Private and
Public Subnet.
From the Navigation panel click "Route Tables"
You will see one for the VPC you created and another for the Default VPC.
Choose the one associated to your Custom VPC.
Click "Actions" then click "Add Tags"
For the tag type "Name" then provide a value. I called it PrivateRoute.
Click "Actions" again and then click "Edit subnet associations"
Select your Private Subnet and then click "Save"
 15. The Private Route table has now been created and associated to the
Private Subnet.
Now we need to create the Public Route table.
Click on "Create route table".
For the Name tag, give it a name. Mine is PublicRoute.
Choose your Custom VPC from the VPC box.
Then click "Create"
 16. Click "Close". Then select your newly created Route table.
Click "Actions". Then click "Edit subnet associations"
Select your Public Subnet and then click "Save"
 17. Now that we have the Public subnet associated with this PublicRoute table
we need to add an additional Route to allow Internet traffic to go out of our
network through the Internet Gateway (IGW) we created a while ago.
So click "Routes". Then click "Edit Routes"
Click "Add route".
Then under Destination enter "0.0.0.0/0" and for Target choose your IGW
Click "Save route"
 18. Now our Public Subnet has an official Route to the Internet through
our IGW.
19. Next step is to setup "Auto-Assign IP address on your Public Subnet so that
all instances created in this subnet will be assigned an internet routable IP.
To do this, from the Navigation pane click on "Subnets". Then select your
public subnet from the list. Click "Actions".
Then click "Modify auto-assign IP Settings". Check the box to enable
auto-assign public IPv4 address.

20. We have one more last requirement to complete. That is to provide an
outbound route for our Private subnet.
If you look at the PrivateRoute, you will see that the only entry is a local
destination route.
To give it a route to the internet you will have to first create a NAT gateway
in the Public Subnet and then route internet traffic to that NAT from your
private subnet.
So from the Navigation Pane click on "NAT Gateway" then click
"Create NAT Gateway"

Select your Public Subnet from the list. Then Click "Create New EIP"
Then click " Create a NAT Gateway"

21. On the next page click on "Edit Route Tables". This will bring you to
the Route Tables section.
Here select the Private Route table you have created. Click "Routes".
Then click "Edit Routes". Click the "Add route" button then for the
destination type 0.0.0.0/0. and then for the Target choose your
NAT Gateway. Then click on "Save routes"

Now we have completed all our requirements for the Custom VPC and
have build one from scratch. You should be proud of yourself for being
able to do this! Good job!
We will use the same requirements:
1. End users are located in US Northern Virginia
2. VPC requires 1 Private and 1 Public subnet with the private subnet having
outbound access to the internet.
3. Defined CIDR Block is 10.0.0.0/16
Method 2: Creating a VPC manually
1. Login to the AWS management console using your Admin account.
2. Select your location based on where your end users will be. In this
case it is US Northern Virginia (US East 1)

3. Click "Services", then scroll down to Network & Content Delivery
and then click "VPC".

4. From the Navigation pane click on "Your VPCs".


for your VPC as well.
Here you can also setup IPv6 if needed or just leave it ad default if not.
As for Tenancy, you have a choice dedicated or default.
Click "Create"

7. You will receive a confirmation that your VPC has been created.
Click "Close" on this window.
You should now see your VPC on the list.
8. Now we have to create the subnets to fulfill our requirements.
On the Navigation pane click on "Subnets"

10. Enter the name you want to give your subnet. I'm naming it MyPublicSN.
Choose your VPC from the list
Choose the Availability zone you wish to deploy it to.
Then provide the CIDR Block for this subnet. I'm using 10.0.0.0/24.

Your Public subnet is now created. Click the "Close" button to close
the window.
11. Now we still have to create the Private subnet.
To do this you can follow the same steps from step number 10.
This time just name the subnet differently to denote it's the Private subnet.
I'm naming it MyPrivateSN
The CIDR Block I'm assigning it is: 10.0.1.0/24

12. Now that we have both Subnets, it is time for us to make the necessary
configurations to make one subnet a private subnet and the other
a public subnet.
To do this we need to first create an Internet Gateway (IGW).
This will be your door to the Internet.
So on the Navigation Pane click "Internet Gateways"
Then click "Create Internet gateway"
Provide it a name (I named it: MyIGW) then click "Create"

13. Click "Close" to go back to the Internet Gateway window.
Now we need to attach the IGW to our VPC.
Select the IGW you created, click "Actions" and then click "Attach to VPC"
Select your VPC from the list and then click the "Attach" button.

14. Now we need to create the necessary Route Tables for the Private and
Public Subnet.
From the Navigation panel click "Route Tables"
You will see one for the VPC you created and another for the Default VPC.
Choose the one associated to your Custom VPC.
Click "Actions" then click "Add Tags"
For the tag type "Name" then provide a value. I called it PrivateRoute.
Click "Actions" again and then click "Edit subnet associations"
Select your Private Subnet and then click "Save"

Private Subnet.
Now we need to create the Public Route table.
Click on "Create route table".
For the Name tag, give it a name. Mine is PublicRoute.
Choose your Custom VPC from the VPC box.
Then click "Create"

Click "Actions". Then click "Edit subnet associations"
Select your Public Subnet and then click "Save"

we need to add an additional Route to allow Internet traffic to go out of our
network through the Internet Gateway (IGW) we created a while ago.
So click "Routes". Then click "Edit Routes"
Click "Add route".
Then under Destination enter "0.0.0.0/0" and for Target choose your IGW
Click "Save route"

our IGW.
19. Next step is to setup "Auto-Assign IP address on your Public Subnet so that
all instances created in this subnet will be assigned an internet routable IP.
To do this, from the Navigation pane click on "Subnets". Then select your
public subnet from the list. Click "Actions".
Then click "Modify auto-assign IP Settings". Check the box to enable
auto-assign public IPv4 address.

20. We have one more last requirement to complete. That is to provide an
outbound route for our Private subnet.
If you look at the PrivateRoute, you will see that the only entry is a local
destination route.
To give it a route to the internet you will have to first create a NAT gateway
in the Public Subnet and then route internet traffic to that NAT from your
private subnet.
So from the Navigation Pane click on "NAT Gateway" then click
"Create NAT Gateway"

Select your Public Subnet from the list. Then Click "Create New EIP"
Then click " Create a NAT Gateway"

21. On the next page click on "Edit Route Tables". This will bring you to
the Route Tables section.
Here select the Private Route table you have created. Click "Routes".
Then click "Edit Routes". Click the "Add route" button then for the
destination type 0.0.0.0/0. and then for the Target choose your
NAT Gateway. Then click on "Save routes"

Now we have completed all our requirements for the Custom VPC and
have build one from scratch. You should be proud of yourself for being
able to do this! Good job!
Comments
Post a Comment